#!/usr/bin/perl

# Filename: import.pl
# Create LDAP addressbook or account by read vpopmail database on MYSQL
# konangsupian@gmail.com
# 13 Okt 2006
# ------------------------
# Updated Sept 2007
# Command shell to get realname & username from vpopmail database.
# mysql -u vpopmail -pmyvpopmailpasswd -e "use vpopmail; select pw_gecos,pw_name from mycompany_com;" > mycompany.txt


$ou = "addressbook";
open(LOGFILE,"mycompany.txt") or die("Could not open file.");
while (<LOGFILE>) {
        chop($_);
        @pisah    = split("\t",$_);
        $email    = $pisah[1]."\@mycompany\.com";
        $realname = $pisah[0];
        @name     = split(" ",$realname);
        $var  = "";
        $var .= "\r\n\r\n";
        $var .= "dn: cn=$realname ($email),ou=$ou,dc=mycompany,dc=com\r\n";
        $var .= "objectClass: top\r\n";
        $var .= "objectClass: person\r\n";
        $var .= "objectClass: organizationalPerson\r\n";
        $var .= "objectClass: inetOrgPerson\r\n";
        #$var .= "objectClass: user\r\n";
        $var .= "cn: $realname ($email)\r\n";
        $var .= "givenName: $realname\r\n";
        $var .= "sn: $name[0]\r\n";
        $var .= "mail: $email\r\n";
        $var .= "physicalDeliveryOfficeName: Gd. Kwarnas Pramuka Jl. Medan Merdeka Timur No. 6 Jakarta\r\n";
        $var .= "postalAddress: Gd. Kwarnas Pramuka Jl. Medan Merdeka Timur No. 6 Jakarta\r\n";
        $var .= "o: MYCOMPANY\r\n";
        $var .= "l: Jakarta\r\n";
        $var .= "ou: $ou\r\n";
        $var .= "st: DKI\r\n";
        $var .= "postalCode: 10110\r\n";
        $var .= "telephoneNumber: +62-21-12345\r\n";
        $var .= "facsimileTelephoneNumber: +62-21-54321\r\n";
        $var .= "pager: +62-\r\n";
        $var .= "mobile: +62-\r\n";
        $var .= "homePhone: +62-\r\n";
        #$var .= "associatedDomain: internaldomain.com\r\n";
        #$var .= "ou: mdgti\r\n";
        #$var .= "userPassword: {MD5}yFfXwwYLUsJXeqTg==\r\n";
        print $var;
}
close($LOGFILE);

# End of import.pl


Action on shell
# ./import.pl > mycompany.ldif

Import data to LDAP with command :
# ldapadd -x -v -c -D "dc=mycompany,dc=com" -W < mycompany.ldif
Enter password: ********

*** Done ****
Wednesday, September 26, 2007
Create LDAP Addressbook from Qmail Account
Sunday, September 23, 2007
Qmail Cluster ? Qmail Partitioning ? Qmail - Postfix Collaboration
Why I use questions on title above?
Because I' m not sure with my concept below is called Qmail Cluster.
Clustering that I get from here is :
CLUSTERING - Clustering is a technology using two or more computers that function together as a single entity for fault tolerance and load balancing. This can increase reliability and uptime in a client/server environment. One computer will sense when another computer is failing or getting bogged down and will take over full operation or just some of its tasks, depending on whether it's a complete fail-over design or just load balancing.
I agree that my design below on picture is called Qmail Partitioning because in my design there is no fail over function and or take over function. In my design only separate a single domain into some server that separated by location on same WAN/MPLS.
I am not writing completely because I assume you are Linux/Unix system administrator so you can get complete of Qmail and Postfix resources at their official site :
http://www.qmail.org/
http://www.lifewithqmail.org/
http://www.postfix.org/
 Note : my design above is already tested and running well.
Wednesday, September 19, 2007
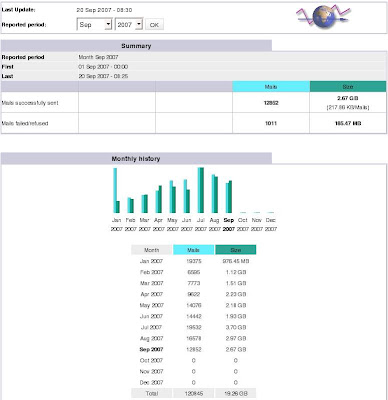
Configure Awstats for Qmail Log
You may have Qmail statistic before read this article. I don't know what you have is better or similar with this one, Awstats Qmail log analyzer. But if you have time you may try this one.
To create Awstats to analyze Qmail Log you have to prepare :
- Log repository, put on crontab and will grep qmail log every 10 minutes. May this not accurate because the log can be duplicate but you can sort this for unique row. Place this log at /var/log/awstats.qmail
[getlog.sh]
#!/bin/sh#!/bin/sh
cat /var/log/qmail/qmail-pop3d/current > /var/log/awstats.qmail
cat /var/log/qmail/qmail-send/current >> /var/log/awstats.qmail
cat /var/log/qmail/qmail-smtpd/current >> /var/log/awstats.qmail - Awstats, download this cute statistics from http://awstats.sourceforge.net/
- Get the script tools that will be used for at ../path/to/awstats/tools. You only need maillogconvert.pl script.
- Create the small program from Phil Hagen named "qmail2awstats.pl" and
[qmail2awstats.pl]#!/usr/bin/perl
# written by phil hagen on 27sep03
while (<>) {
@months = ('NUL', 'Jan', 'Feb', 'Mar', 'Apr', 'May', 'Jun', 'Jul', 'Aug', 'Sep', 'Oct', 'Nov', 'Dec'); $hostname = `hostname`;
# $hostname = `hostname -s`;
chomp $hostname;
$line = $_;
$line =~ s/\d{4}-(\d{2})-(\d{2}) (\d{2}:\d{2}:\d{2}).\d{9} (.*)/$months[$1] $2 $3 $hostname qmail: 0000000000.000000 $4/; print $line;
} - Edit the Awstats configuration that placed or may have to create at /etc/awstats/awstats.mail.conf that called only short name "mail" later in awstats command.
[/etc/awstats/awstats.mail.conf]LogFile="/usr/local/bin/tai64nlocal < /var/log/awstats.qmail |\
/var/www/htdocs/awstats/tools/qmail2awstats.pl | \
/var/www/htdocs/awstats/tools/maillogconvert.pl standard | "
SiteDomain="mail.mydomain.com"
HostAliases="mail.mydomain.com"
DirData="/data/awstats"
DirCgi="/awstats"
DirIcons="/awstatsicons"
AllowToUpdateStatsFromBrowser=0
AllowFullYearView=2
LogType=M
LogFormat="%time2 %email %email_r %host %host_r %method %url %code %bytesd"
LevelForBrowsersDetection=0
LevelForOSDetection=0
LevelForRefererAnalyze=0
LevelForRobotsDetection=0
LevelForWormsDetection=0
LevelForSearchEnginesDetection=0
LevelForFileTypesDetection=0
ShowMenu=1
ShowSummary=HB
ShowMonthStats=HB
ShowDaysOfMonthStats=HB
ShowDaysOfWeekStats=HB
ShowHoursStats=HB
ShowDomainsStats=0
ShowHostsStats=HBL
ShowAuthenticatedUsers=0
ShowRobotsStats=0
ShowEMailSenders=HBML
ShowEMailReceivers=HBML
ShowSessionsStats=0
ShowPagesStats=0
ShowFileTypesStats=0
ShowFileSizesStats=0
ShowBrowsersStats=0
ShowOSStats=0
ShowOriginStats=0
ShowKeyphrasesStats=0
ShowKeywordsStats=0
ShowMiscStats=0
ShowHTTPErrorsStats=0
ShowSMTPErrorsStats=1
Why the awstats configuration must be at /etc/awstats ? Here is the DOC:
# AWSTATS CONFIGURE FILE 6.6
#-----------------------------------------------------------------------------
# Copy this file into awstats.www.mydomain.conf and edit this new config file
# to setup AWStats (See documentation in docs/ directory).
# The config file must be in /etc/awstats, /usr/local/etc/awstats or /etc (for
# Unix/Linux) or same directory than awstats.pl (Windows, Mac, Unix/Linux...)
# To include an environment variable in any parameter (AWStats will replace
# it with its value when reading it), follow the example:
# Parameter="__ENVNAME__"
# Note that environment variable AWSTATS_CURRENT_CONFIG is always defined with
# the config value in an AWStats running session and can be used like others.
#----------------------------------------------------------------------------- - Create directory to save the log data
# mkdir -p /data/awstats - Add and change the cgi alias on apache, the configuration is :
ScriptAlias /cgi-bin/ "/var/www/cgi-bin/"

<Directory "/var/www/cgi-bin">
  AllowOverride None
  Options None
  Order allow,deny
  Allow from all
</Directory>

Alias /awstatsclasses "/var/www/htdocs/awstats/wwwroot/classes/"
Alias /awstatscss "/var/www/htdocs/awstats/wwwroot/css/"
Alias /awstatsicons "/var/www/htdocs/awstats/wwwroot/icon/"
ScriptAlias /awstats/ "/var/www/htdocs/awstats/wwwroot/cgi-bin/"

<Directory "/var/www/htdocs/awstats/wwwroot">
  Options None
  AllowOverride None
  Order allow,deny
  Allow from all
</Directory>
Restart apache. - Create and or add in crontab :
#Awstats mail statistics
*/10 * * * * /var/www/htdocs/awstats/tools/getlog.sh
*/15 * * * * /var/www/htdocs/awstats/wwwroot/cgi-bin/awstats.pl -update -config=mail > /dev/null - Run at your browser to access your mail statistics :
http://www.mydomain.com/awstats/awstats.pl?config=mail - Done.

Sunday, September 16, 2007
Squid & Dansguardian the proxy and web content filter
If you have huge network with huge users that can be categorized "the creative users" so make you unhappy with your bandwidth usage that in fact is for unproductive uses.
You can choose this solution by combination of using Squid proxy (http://www.squid-cache.org/) and Dansguardian (http://dansguardian.org/) as a web content filtering. As my exeperience you can use of any Squid stable release. For Dansguardan I suggest you to use the old version reason by the speed performance. I use the version dansguardian-2.8.0.6.source.tar.gz and this is the best performance of Dansguardian.
Here you will find the Dansguardian and Squid configuration. For example below the Dansguardian listen on port 3128 on IP address 10.80.123.202 and the Squid Proxy listen on port 33445 on the same IP.
[ Dansguardian ]
....
# Network Settings
#
# the IP that DansGuardian listens on. If left blank DansGuardian will
# listen on all IPs. That would include all NICs, loopback, modem, etc.
# Normally you would have your firewall protecting this, but if you want
# you can limit it to only 1 IP. Yes only one.
# The Dansguardian IP address itself
filterip = 10.80.123.202
# the port that DansGuardian listens to.
# Port-nya DansGuardian
filterport = 3128
# the ip of the proxy (default is the loopback - i.e. this server)
proxyip = 10.80.123.202
# the port DansGuardian connects to proxy on
# Port-nya SQUID
proxyport = 33445
....
For default configuration you will get good filtering performance. But if you have own rule will be added please look at the Dansguardian config file at /etc/dansguardian. List of the file is below:
bannedextensionlist
bannediplist
bannedmimetypelist
bannedphraselist
bannedregexpurllist
bannedsitelist
bannedsitelist.processed
bannedurllist
banneduserlist
blacklists/
contentregexplist
dansguardian.conf
dansguardianf1.conf
ep.allow
ep.strict
exceptioniplist
exceptionphraselist
exceptionsitelist
exceptionurllist
exceptionuserlist
filtergroupslist
greysitelist
greyurllist
languages/
logrotation*
phraselists/
pics
transparent1x1.gif
weightedphraselist
EXAMPLE
# Block friendster images on bannedregexpurllist
(^|[\?+=&/])(photos.*\.friendster\..*/.*)([\?+=&/]|$)
# Block site on bannedsitelist
www.kaskus.us
www.tigerhorn.com
photos.friendster.com
... etc
---------
For Squid there is nothing special configuration. You may change your default squid port to unusual port used by. For example you can change to port 33445.
[Squid]
....
http_port 33445
....
Thursday, September 13, 2007
Mounting NTFS File System on Linux
How to mount your NTFS drive into your Linux Box? Find the steps below :
- Download ntfs-3g from http://www.ntfs-3g.org/
The NTFS-3G driver is an open source, freely available read/write NTFS driver for Linux, FreeBSD, Mac OS X, NetBSD, and Haiku. It provides safe and fast handling of the Windows XP, Windows Server 2003, Windows 2000 and Windows Vista file systems. Most POSIX file system operations are supported, with the exception of full file ownership and access right support. - Compile the source
# tar -zxvf ntfs-3g-1.913.tgz
# cd ntfs-3g-1.913
# ./configure
# make
# make check
# make install
The program path is /usr/local/bin/ - Check your disk partition
[root@konang]# /sbin/fdisk -l
Disk /dev/sda: 80.0 GB, 80000000000 bytes
255 heads, 63 sectors/track, 9726 cylinders
Units = cylinders of 16065 * 512 = 8225280 bytes

Device Boot Start End Blocks Id System
/dev/sda1 1 4 32098+ de Dell Utility
/dev/sda2 * 5 3350 26876745 7 HPFS/NTFS
/dev/sda3 3351 9725 51207187+ f W95 Ext'd (LBA)
/dev/sda5 3351 8429 40797036 7 HPFS/NTFS
/dev/sda6 8430 8462 265041 83 Linux
/dev/sda7 8463 8593 1052226 82 Linux swap / Solaris
/dev/sda8 8594 9725 9092758+ 83 Linux - Create mount directory
# mkdir -p /mnt/windows-c
# mkdir -p /mnt/windows-d - Put into RC file /etc/rc.d/rc.local (load automatically when reboot)
mount -t ntfs-3g /dev/sda2 /mnt/windows-c
mount -t ntfs-3g /dev/sda5 /mnt/windows-d - Test
# df
[root@konang]# df
Filesystem 1K-blocks Used Available Use% Mounted on
/dev/sda8 8807924 7444172 909116 90% /
/dev/sda6 256666 15646 227768 7% /boot
tmpfs 233164 0 233164 0% /dev/shm
/dev/sda1 32018 7322 24696 23% /mnt/flashdisk
/dev/sda2 26876744 17725572 9151172 66% /mnt/windows-c
/dev/sda5 40797032 16751732 24045300 42% /mnt/windows-d - List
# cd /mnt/windows-c
# ls -asl /mnt/windows-c

[root@konang]# ls -asl /mnt/windows-c
total 773752
12 drwxrwxrwx 1 root root 12288 Sep 13 19:02 .
8 drwxr-xr-x 9 root root 4096 Aug 10 15:42 ..
1 -rwxrwxrwx 1 root root 257 Aug 22 2006 adaaja.csv
8 drwxrwxrwx 1 root root 8192 Mar 9 2007 Alfresco
8 drwxrwxrwx 1 root root 8192 Jun 15 2006 apache
0 drwxrwxrwx 1 root root 0 Feb 8 2006 apachefriends
0 -rwxrwxrwx 1 root root 0 Aug 11 2004 AUTOEXEC.BAT
1 -rwxrwxrwx 1 root root 211 Dec 12 2005 boot.ini
0 -rwxrwxrwx 1 root root 0 Aug 11 2004 CONFIG.SYS
8 drwxrwxrwx 1 root root 8192 Feb 7 2006 dell
4 -rwxrwxrwx 1 root root 3696 Nov 19 2005 dell.sdr
4 drwxrwxrwx 1 root root 4096 Aug 6 09:26 Documents and Settings
4 drwxrwxrwx 1 root root 4096 Nov 19 2005 DRIVERS
4 drwxrwxrwx 1 root root 4096 Jul 24 13:28 EasyEclipse-for-LAMP-1.2.. - Done
Sunday, September 9, 2007
Squirrelmail with OpenLDAP Addressbook
How Squirrelmail access LDAP server addressbook? In this case you have OpenLDAP server but not an Active Directory !
- First you must have OpenLDAP service installed on your Linux Box. You can get it free from http://www.openldap.org/software/download/
- Your PHP must be compiled include LDAP component. You just add --with-ldap when compiling PHP from source.
- Configure it and specify the OU schema and Addressbook schema in LDIF format.
Please find the steps below:
[/etc/openldap/slapd.conf]
#### SECURITY SETTING ###
disallow bind_anon
#######################################################################
# BDB database definitions
#######################################################################
database bdb
suffix "dc=mycompany,dc=com"
rootdn "dc=mycompany,dc=com"
rootpw {SSHA}UWPj+&**%$^*(7987897*&%*^&*^
directory /var/openldap-data
index objectClass eq
[Addressbook OU]
dn: ou=addressbook,dc=mycompany,dc=com
objectClass: top
objectClass: organizationalUnit
ou: addressbook
userPassword: {SHA}7lUIYUIYKJHKYIYtTkXU=
[Addressbook LDIF]
dn: cn=My Name (myname@mycompany.com),ou=addressbook,dc=mycompany,dc=com
objectClass: top
objectClass: person
objectClass: organizationalPerson
objectClass: inetOrgPerson
cn: My Name (myname@mycompany.com)
givenName: My Name
sn: My Name
mail: myname@mycompany.com
physicalDeliveryOfficeName: G.Kwarnas
postalAddress: G.Kwarnas
o: mycompany
l: -
ou: addressbook
st: -
postalCode: 10110
telephoneNumber: 1696
facsimileTelephoneNumber: +62-21
pager: +62-21
mobile: +62-21
homePhone: +62-21
How to load LDIF data into OpenLDAP server?
From the Linux shell please type the following command (example the file is "addressbook-2.ldif.txt") :
shell# ldapadd -x -v -c -D "dc=mycompany,dc=com" -W < addressbook-2.ldif.txt
Now is the time to configure Squirrelmail config file. Please add the following script to link your webmail with OpenLDAP server:
[Squirrelmail config.php]
$ldap_server[0] = array(
'host' => '10.80.123.203',
'base' => 'ou=addressbook,dc=mycompany,dc=com',
'name' => 'LDAP: Addressbook Global',
'binddn' => 'ou=addressbook,dc=mycompany,dc=com',
'bindpw' => 'mycompany',
'filter' => '(objectclass=*)',
'protocol' => 3,
'limit_scope' => false,
'listing' => true,
'search_tree' => true,
'starttls' => false
);
Yes! Now your webmail connected with OpenLDAP addressbook.
Thursday, September 6, 2007
Building IM Server by Openfire 3.3.2 - Jabber
You want the IM server at your office ? Use the the Openfire IM server. This software is free and great. How to install this one ? Its very easy.
- Download source at: http://www.igniterealtime.org/downloads/index.jsp
- tar -zxvf openfire_3_3_X.tar.gz
- cd openfire_3_3_X/bin/
- Run this server by command: openfire start
If you want autostart please put this on /etc/rc.d/rc.local (For Linux platform) :
For example : /data/ftp/mti/software/linux-app/openfire/bin/openfire start - Open web based admin management, example : http://10.80.123.203:9090/
Login as : admin, Password: password
Here you go for anything. Create user, configure port, service, user management and etc. - Please try to connect to Openfire server using Kopete or Meebo (must be IP public, Jabber program, format: username@ip-public-your-open-fire-server)
- Enjoy it !
- You can install various plugins just only select them !
Openfire (formerly Wildfire) is a real time collaboration (RTC) server dual-licensed under the Open Source GPL and commercially. It uses the only widely adopted open protocol for instant messaging, XMPP (also called Jabber). Openfire is incredibly easy to setup and administer, but offers rock-solid security and performance.
Tuesday, September 4, 2007
Force wallpaper & screen saver by Windows Active Directory
How to force wallpaper & screen saver by Windows Active Directory ?
- Menu Start
- Programs
- Administrative Tools
- Active Directory Users & Computers
- Right click -> your local domain (example mynetwork.com)
- Properties
- Choose control tab "Group Policy"
- Double click "Default Domain Policy"
- You will get window of "Group Policy" and there is 2 main items on root tree, "Computer Configuration" and "User Configuration".
- Choose the "User Configuration".
- You will get on tree : "Software Settings", "Windows Settings" and "Administrative Templates"
- Choose "Administrative Templates" tree.
[Force Wallpaper]
- In the Administrative Templates, Click Desktop
- Click "Active Desktop"
- Please enable :
- - Enable Active Desktop -> enabled
- - Prohibit Changes -> enabled
- - Active Desktop Wallpaper -> enabled
- * Type your wallpaper path file :
- * Example : \\10.20.2.2\wallscr\er_wall.jpg
- * Choose wallpaper style : strech
Next ...
[Force Screensaver]
- In the Administrative Templates Click Control Panel
- Click Display
- - Prevent changing wallpaper -> enabled
- - Screen Saver -> enabled
- - Screen saver executable name -> enabled
- * Type your screensaver path file :
- * Example: \\10.20.2.2\wallscr\er_scr.scr
- - Screen saver time out -> enabled
- * Set time out (in second)
- Please user to logout and login again (2 times)
- Finish
Monday, September 3, 2007
SSH Tunneling
You have a trouble when you got your localhost (your computer) has no route to XWindows public server (linux, unix base). Your computer only has route to one of computer in the network which has route to public server that you want.
Somebody that ever install Oracle via remote connection will find this problem.
Example:
Your local computer is "localhost"
Your server #1 is private IP "10.80.123.203"
Your server #2 is public IP "203.13x.xxx.xx"
Localhost ----- Server #1 ------- Server #2
|______ XWindows Application _______|
|___________ No Route ______________|
How to get connection via SSH so you can remote your public server include the XWindows application ?
Here are the steps must be done :
SSH tunneling from 10.80.123.203 to public IP 202.13x.xxx.xx
# ssh konang@10.80.123.203 -p 2350
# ssh -L 2211:127.0.0.1:2350 konang@203.13x.xxx.xx -p 2350
SSH tunneling from localhost to 10.80.123.203
# ssh -L 2211:127.0.0.1:2211 konang@10.80.123.203 -p 2350
SSH to 203.13x.xxx.xx via tunnel + forward X
# ssh -X konang@localhost -p 2211
For example on X environment :
# xclock &
You will get "xclock" program from remote 203.13x.xxx.xx
Sunday, September 2, 2007
Custom Microsoft Windows Taskbar Date
I remember when I use this method first time to custom Microsoft Windows 98 Taskbar. This method can be apply too on Windows NT, Windows 2000, Windows XP and Windows 2003. For Windows Vista I am sure this no problem even not tested before. Here is the steps and I hope you are enjoyed.
- Click Control Panel.
- Double click "Regional and Language Options".
- Select (default) "Regional Options" tab.
- Click "Customize" next of the Country Language select menu.
- Select "Time" tab.
- Go to "Time Format".
- Default value is : hh:mm change to : 'MYNAME' HH:mm (Note! in the singe quote, 24 hour system), for 12 hour system remove one of "H" letter so became 'MYNAME' H:mm.
- Click Apply --> OK --> Apply ... so then you got new taskbar date !
 Don't forget to Click Apply / OK, and then you got back to previous window and click Apply and OK to effect the taskbar date. Sorry for uncomplete steps on image above.
Subscribe to:
Posts (Atom)
